It’s Inspiration Wednesday and today I have another beautiful layout to share using the Classic Petunia Collection from Heartfelt Creations. No surprise here, this is another stunning floral collection from Heartfelt.
I love how this collection has different colour variations that you can work with, one of which are the purple tones which I chose to create with for today’s reveal.

HCDP1-278 Classic Petunia Paper Collection
HCPC-3785 Small Classic Petunia Cling Stamps
HCPC-3786 Large Classic PetuniaCling Stamps
HCPC-3787 Classic Petunia Bouquet Cling Stamps
HCD1-7139 Small Classic Petunia Dies
HCD1-7140 Large Classic Petunia Dies
HCD1-7141 Classic Petunia Bouquet Dies
HCD1-747 Arianna Lace Dies
HCD1-745 Luggage and Tags Dies
HCDA2-450 Stack and Store Daubers- 30 Pack
HCST1-401 Deluxe Flower Shaping Kit
245125 3D Crystal Lacquer
Other Products Used:
Chameleon Pens (NU3, VO4, GR4, GR1), ColorBox Ink (Thistle, Violet), Dew Drops (Clear), Iris Beads (Clear), Paperlicious- Crystal Clear, May Arts Ribbon (Rhinestones, Ivory Burlap String), Hot Glue, Scrapbook Adhesives by 3L (White Photo Corners, Dual Tip Glue Pen, 3D Foam Squares, Thin 3D Foam Squares, EZ Runner Grand), Corner Rounder, Cardstock (White, Green), Sequins, Gems, Pearls.

The purple bordered patterned paper is your background. Cut the purple patterned paper down to around 9×9 and round the corners. Adhere to the middle of the layout. Cut a piece of white cardstock that is 2.5×8.5 and round the bottom two corners and adhere to the bottom portion of the purple patterned paper. Cut a strip of the dark green patterned paper that is 2×12. Cut a piece of the pink patterned paper that is 0.75×12. Adhere these layers together and then to the layout, just below the middle. Add the rhinestone ribbon along the middle of the layered border.
Find and cut out the green mini tag, the mini framed green journal block and the purple “Life’s Beautiful Moments” strip. Set aside. Stamp and die cut 5 of the Classic Petunia Bouquet basket images. I added a little bit of colour to the images using a neutral Chameleon pen. Adhere these below the layered border. This creates a scalloped border look that I love.
Mat your photo in white and green cardstock, and add white photo corners to the photo. Adhere to the layout using 3D foam squares to the left hand side of the layout. Add the mini tag just above your matted photo using a thinner 3D foam tape and add a twine bow.. Add the mini journal block to the left of the matted photo. Die cut one of the Arianna Lace die from white cardstock and adhere to the right hand side of the matted photo.
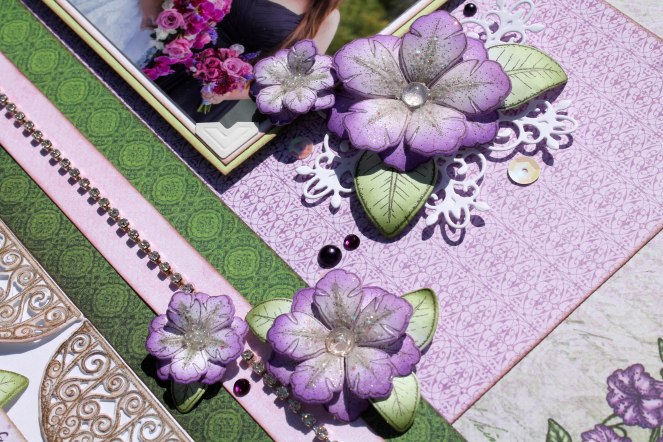
Stamp and die cut 2 sets of the largest Large Classic Petunia flowers and leaves. Stamp and die cut 2 sets of the smallest Small Classic Petunia flowers. Stamp and die cut 2 sets of the larger Small Classic Petunia flowers. I added colour to the leaves using Chameleon Pens. I added colour to the flowers using ColorBox inks and Heartfelt Creations daubers. Shape and assemble the flowers and leaves. Using a clear drying liquid adhesive I added Crystal Clear glitter to the petals of all of my flowers. Let dry. Using a liquid adhesive I added dew drops and clear beads to the middle of the flowers. Let dry. Adhere one of the smallest petunias to the left of the matted photo. I also added sequins, gems and pearls around the flower. To the right of the photo I added the largest petunia and a small petunia, as well as other embellishments. I added a medium and a small petunia to the layered border. At the bottom of the layout I added the other medium petunia and then arced the title strip over top of the flower.

Thanks so much for stopping by!
In case you missed it..
Introducing Classic Petunia


Hi…like the LO’s
LikeLike
Love this Layout Hugs S xx
LikeLike
What a lovely piece! So much attention to detail!
LikeLike
love that pop of green
LikeLike
Wow…beautiful layout Tracy!
LikeLike